
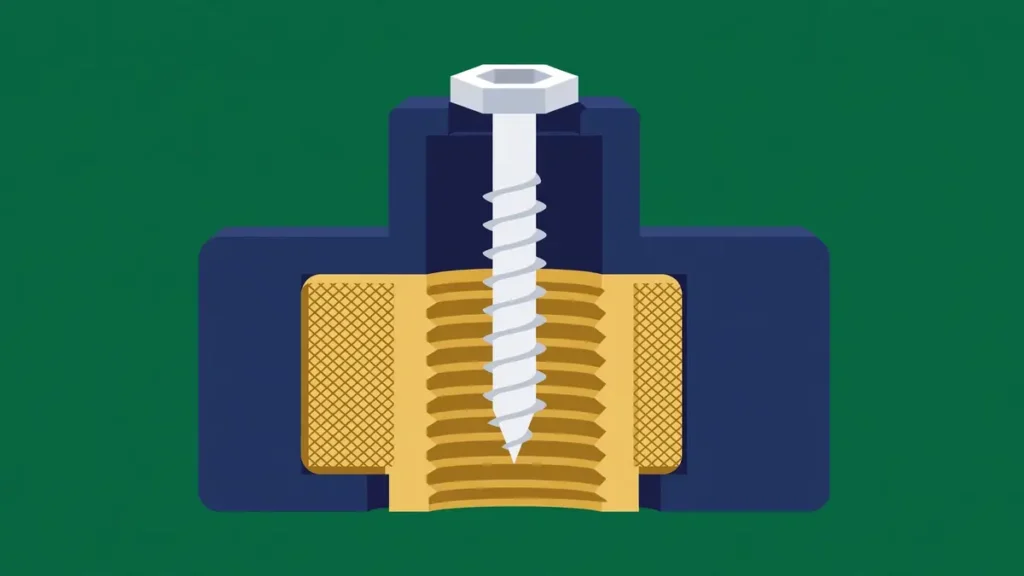
A screw driven straight into a molded plastic boss holds well the first time. By the tenth removal — a service cover, a battery door, a control panel taken off and put back — the thread in the plastic is worn, the boss may be cracked, and the joint no longer clamps. That is the problem a metal threaded insert solves: a metal thread inside the plastic part, so the screw always bites into metal, not resin.
A metal threaded insert is worth using when a molded part must be assembled and taken apart more than a few times, or when the joint must carry real clamping load. For a joint opened only once or twice, a molded thread or a self-tapping screw is usually enough. When an insert is needed, the method follows the volume, the resin and the load: molded-in gives the strongest bond and suits thermosets and high volumes; heat-set suits thermoplastics at medium to high volumes; ultrasonic suits thermoplastics where heat staking is not already in place; cold press-in suits low volumes and light loads.
How to use this guide: to choose between an insert and the alternatives, read the first table. If you already know you need an insert, go straight to the method-choice table. If the drawing is already issued, start with the boss-design rules and the drawing checklist.
Do you need a metal insert at all?
The first decision is not which insert to use, but whether the joint needs one. An insert adds a component, a process step and a failure mode of its own: misplaced, tilted or filled with resin, it is worse than no insert at all. A joint assembled once at the factory and never opened again does not need a metal thread; a joint a service technician opens every month does.
| Option | How it works | Best for | Watch out for |
|---|---|---|---|
| Molded-in metal insert | A metal insert is placed in the mold and resin is molded around it | Repeated assembly, highest pull-out and torque resistance, thermosets and thermoplastics | Needs close-tolerance locating pins; insert loading slows the cycle; resin must be kept out of the thread |
| Heat-set insert | A heated insert melts its way into a molded or drilled hole; resin flows into the knurl and hardens | Thermoplastic parts at medium to high volume; repeatable, automatable installation | Only works on thermoplastics; hole size and boss design must suit the insert |
| Ultrasonic insert | Vibration melts a ring of plastic around the insert as it is pressed in | Thermoplastic parts where ultrasonic equipment is already in use | Needs precise control; can chip the material; harder to automate than heat staking |
| Cold press-in insert | An insert is pressed into a hole cold, held by an expansion feature or an interference fit | Low volumes, thermosets, quick installation with only a press | Lowest strength of the four insert methods; relies on the resin’s elasticity |
| Molded plastic thread | The thread is formed in the mold as part of the plastic part | Large threads, closures, caps, joints assembled once or a few times | Wears with repeated use; weaker than a metal thread; needs draft and careful mold design |
| Self-tapping screw into a molded boss | A screw cuts or forms its own thread in a plain molded hole | Low-cost, low-volume, joints assembled once or twice | Each removal wears the thread; boss can crack from hoop stress; not a service joint |
Three questions settle this table. First, how many times will the joint be opened? A cover removed for battery changes or routine service is an insert joint. Second, what load must it carry? A screw holding a cosmetic cover asks little; a screw clamping a seal or holding a bracket against vibration asks a great deal more. Third, what happens if it fails? A stripped thread on a service cover is an annoyance; on a safety-critical point it is a return or a warranty claim. The higher the consequence, the stronger the case for metal.
The four ways to put an insert in
All four methods end with the same thing — a metal thread held in plastic — but each imposes its own demands on the mold, the resin and the cell. The descriptions below follow the account published by Plastics Technology, drawing on fastener manufacturer PennEngineering.
Heat staking: the common choice for thermoplastics
Heat staking starts with a hole already in the part, slightly smaller than the insert’s outside diameter. The heated insert is pressed in, melts a thin ring of plastic around itself, and the softened resin flows into the knurl pattern and hardens, locking the insert in place. It is the most commonly applied process for thermoplastics, according to Plastics Technology: easy to control, relatively low in cost, and automatable, with several inserts pressed in at once. It works by re-melting plastic, so it only works with thermoplastics.
Ultrasonic insertion: fast, but harder to control
Ultrasonic insertion works on the same principle, but the heat comes from vibration rather than a heated press. It matches heat staking for speed, but it requires precise control, can chip the material, and is harder to automate — use it only where the capability is already in place.
Molded-in inserts: the strongest bond, the most demanding mold
With a molded-in insert, the insert is placed in the mold before the shot — seated over a pin machined into the mold core — and the resin is molded completely around it. The result is generally the best overall bond of the four methods, and it eliminates any secondary insertion step. Protolabs’ insert molding guide makes the same point: because there is no chemical bonding between metal inserts and plastic, the joint must be designed for a mechanical bond, and a molded-in insert, fully encapsulated, achieves that directly.
Molded-in inserts come in two forms, and the drawing must say which one. A thru-threaded insert is open at both ends and needs solid contact with both core and cavity surfaces to keep resin out of the thread; a blind-threaded insert is closed at one end, so cavity contact is not required. The cost is in the mold and the cycle: close-tolerance pins in the core, and insert placement between cycles. A vertical press, where the lower mold half gives open access from above, can make insert loading far more practical; our guide to vertical injection molding for insert molding explains when that orientation earns its place. Loading can be robotized at high volumes; at low to mid volumes it is often manual.
Cold press-in: the cheapest installation
Cold press-in inserts are pressed into a hole without heat, needing only a simple press — the most economical installation, and the natural choice for thermosets, where heat staking and ultrasonic insertion cannot work. Expansion inserts flex as they are inserted, then bite into the hole wall when the mating screw is installed. Solid-body inserts perform better, but still not to the standard of the processes that melt plastic around the insert. Use them where the load is light — not where the joint carries the product.
Which method fits your volume, resin and load?
The table below is the decision this article exists to support — a starting point for the discussion with your supplier, not a specification. The insert manufacturer’s datasheet for the exact insert, and a trial on your part, are what turn a table row into a decision.
| Situation | First choice | Why | Alternative if it does not fit |
|---|---|---|---|
| Thermoplastic, high volume, repeated assembly, high load | Molded-in insert | Strongest bond; no secondary operation; loading can be automated | Heat-set insert if molded-in loading is impractical for the part geometry |
| Thermoplastic, medium to high volume, repeated assembly | Heat-set insert | Most common thermoplastic process; easy to control; several inserts pressed at once | Ultrasonic insert if ultrasonic equipment is already in place |
| Thermoplastic, low volume or prototypes, repeated assembly | Heat-set or cold press-in | Heat-set needs only a thermal press; press-in needs only a simple press | Molded-in insert if the design is frozen and the trial can prove it |
| Thermoplastic, ultrasonic welding already used in the plant | Ultrasonic insert | Comparable speed to heat staking; uses existing capability | Heat-set insert if chipping or process control becomes a problem |
| Thermoset, any volume, repeated assembly | Molded-in insert | Heat and ultrasonic methods cannot work on thermosets; molded-in gives the best bond | Cold press-in where the load is light and the resin’s elasticity suits it |
| Thermoset, low volume, light load | Cold press-in insert | Cheapest installation; no special equipment | Molded-in insert if the joint load rises or the press-in joint fails trial |
| Light load, joint opened rarely, cost is the driver | Cold press-in insert, or a self-tapping screw with no insert | Lowest total cost where strength is not the constraint | Heat-set insert if the joint is opened more often than first assumed |
| Very small fastener (M1–M2), handheld device | Heat-set or ultrasonic micro insert | Micro inserts are available down to 1 mm diameter for an M1 fastener | Molded-in micro insert where the mold can locate it reliably |
Two cautions belong with this table. First, volume changes the answer: a method right at 500 parts a year can be wrong at 500,000 — state the annual volume in the RFQ, and whether it is expected to grow. Second, the resin family decides two of the four methods outright: heat staking and ultrasonic insertion re-melt plastic, so they only work with thermoplastics; for thermosets, the options are molding in or cold-pressing. Settle the resin before choosing the insert method.
Illustrative example — not a test result, not a quotation, and not a guarantee for any part. Consider a control-panel housing in ABS, opened by a service technician about once a month, with four M4 screws holding the cover — opened often enough that a self-tapping screw would wear the boss within a few service visits, under a clamping load, not a structural one. At a few thousand parts a year, a heat-set brass insert is the natural first choice. Now change one fact: the same housing in a thermoset resin. Heat staking is no longer possible, and the choice becomes molded-in, or cold press-in if the load is light. One changed fact, a different method.
What makes a joint strong: pull-out versus torque-out
An insert joint can fail in two ways, and a buyer who specifies only one has specified half the joint. The two strength factors, as Plastics Technology sets them out, are pull-out force and torque-out force — resistance to the insert pulling out, and to it twisting when the mating fastener is torqued. The longer the insert, the greater the pull-out resistance; the greater the diameter, the more torque capacity — and they are not interchangeable: a long, narrow insert can resist pulling out and still spin when the screw is torqued.
The knurl pattern on the outside of the insert is what converts its shape into grip. Straight knurls resist torque best but pull-out less; grooves between knurl bands increase pull-out resistance; diagonal, or helical, knurls balance both; the hexagonal or diamond-shaped knurl, probably the most common, resists in all directions. Name the knurl type on the drawing or in the insert part number.
Brass is the most common insert material. Stainless steel offers better strength and corrosion resistance, and aluminium inserts are about 70% lighter than brass, according to PennEngineering via Plastics Technology. State the insert material and the reason on the drawing, so a substitution is recognised as a change. Standard inserts cover thread sizes from #0-80 to 3/8-16, or M2 to M10, as published by PennEngineering; micro inserts go as small as 1 mm in diameter, for an M1 fastener.
The resin around the insert carries the load the insert transfers into the part, and different resins do not hold an insert equally well. The insert manufacturer’s pull-out data is measured in one resin under one set of conditions; your part is a different resin, boss and temperature — treat published figures as orientation, and prove the joint on your part (see the T1 checklist below).
Boss design rules: the plastic around the insert
The insert is metal; the boss is plastic; the joint is only as strong as the plastic that holds the insert. Most insert failures are boss failures — a cracked boss, a boss too thin to resist the hoop stress of the screw, an insert sitting in a weld line, or a boss placed so close to a thin wall that the wall fails first. The rules below are design rules of thumb, to confirm against the insert manufacturer’s datasheet and the trial, not Cavity Mold capability.
Give the boss enough wall. A widely used rule of thumb is a boss outside diameter about twice the insert outside diameter, leaving roughly one insert radius of plastic on each side. A much thinner boss is likely to crack when the screw is torqued.
Make the insert long enough for the load. Pull-out resistance grows with insert length, because a longer insert has more knurl engaged with more plastic. A short insert in a deep boss saves little and costs pull-out strength directly — specify insert length, boss depth and hole depth together.
Keep the boss away from thin walls, edges and weld lines. A boss on a thin wall will sink, crack or distort it, and a boss too close to an edge has too little material on one side to hold the insert. A weld line — where two melt fronts meet — is the weakest line in the part.
Design the hole for the insert, not the screw. For heat-set and ultrasonic inserts, the hole is slightly smaller than the insert outside diameter, and its exact size comes from the insert manufacturer — not from the screw size, and not from a generic table. A hole too large gives the resin nothing to grip; too small, and it cracks the boss.
Support the boss. A tall, free-standing boss is a lever: any side load on the screw bends it, and the insert pulls at an angle rather than straight out. Add ribs or gussets where the design allows, tying the boss back into a wall or the base of the part.
Mind the thread shutoff. For a thru-threaded molded-in insert, the insert must make solid contact with both the core and the cavity surfaces, or resin will flow inside and fill the thread. Flash at the shutoff is a defect to check at T1: flash in the thread prevents the screw from seating, and flash at the shutoff can mean the insert moved during the shot.
What to write on the drawing and in the RFQ
An insert requirement that a supplier can quote, make and prove has six parts. Write all six; any one missing leaves room for a different assumption, usually discovered at the trial — when it is most expensive to correct.
| # | Item | What to write | Why it changes the outcome |
|---|---|---|---|
| 1 | Insert type and method | Molded-in, heat-set, ultrasonic or cold press-in; insert supplier and part number, or "or equivalent" with the equivalence criteria stated | The method decides the mold design, the equipment and the cost; "insert" on its own decides none of them |
| 2 | Thread size and material | Thread size and class, e.g. "M4 × 0.7, brass insert"; stainless or aluminium where weight or corrosion requires it | A thread size without a material is an incomplete component; a material change is a joint change |
| 3 | Boss dimensions | Boss outside diameter, boss height, hole diameter and depth, insert length and seating depth | The boss is the joint; without its dimensions the supplier must guess the strength |
| 4 | Resin and condition | Exact resin grade, filler content, and any temperature or chemical exposure the joint will see | Pull-out data is resin-specific; a different grade is a different joint |
| 5 | Load and use | How often the joint is opened, the clamping or pull-out load if known, and the consequence if the joint fails | Decides whether the joint needs proof testing at all, and how much evidence is enough |
| 6 | Evidence required | Pull-out or torque evidence if required, insert position and depth tolerance, and the trial stage at which it is proved (T1) | Without an evidence requirement, the joint is accepted on appearance — which proves nothing about strength |
Add three more lines to the RFQ: the annual volume and whether it is expected to grow, the number of inserts per part, and who supplies the inserts. Where the part also uses overmolding, the interface needs the same treatment: our guide to 2-shot injection molding covers the two-material methods, and the Protolabs overmolding and insert molding guide sets out how insert molding sits beside two-shot and pick-and-place overmolding — with no chemical bond between metal and plastic, the joint must be designed for a mechanical bond.
What to check at T1: the insert acceptance checklist
An insert joint is proved at trial, not assumed from the drawing. Use this checklist at T1, and repeat the relevant items whenever the insert, the resin, the boss design or the supplier changes.
- Insert position and depth — every insert is in the position and at the depth the drawing calls for, in every cavity.
- No resin inside the thread — the thread is clean and a mating screw (or the specified go gauge) enters freely to full engagement depth.
- Pull-out and torque evidence — where the drawing states a pull-out or torque requirement, the trial supplies measured results against it, with sample size, cavity and test method recorded.
- No boss cracking — bosses are checked for cracks after insert installation and after the mating screw is torqued.
- No flash at the insert shutoff — the shutoff face is clean, with no fin of resin preventing the screw from seating or the mating part from clamping flat.
- Screw engagement and clamp check — the mating screw engages the full specified thread length, the clamped parts sit flat, and the joint holds the specified torque without the insert spinning.
- Repeat assembly check — where the joint is a service joint, open and close it the number of times the product will see in service and re-check torque and pull-out afterwards. A joint that passes once and fails on the fifth cycle has not been proved.
The wider approval sequence is covered in our guide to approving T1 samples and first articles; the insert checklist above is one block of that package, and production should not be released until it is complete.
What inserts cost — and where the money actually goes
There is no single price for an insert joint, and any article that quoted one would be inventing it. What can be said honestly is where the cost sits, so the buyer can compare methods on total cost, not on the component price alone. As Plastics Technology notes, the total cost must include molding time and cost, component handling and assembly.
The component itself is usually the smallest part of the cost. A molded-in insert needs locating pins, close tolerances and insert loading time in every cycle — paid on every shot for the life of the tool. A heat-set or ultrasonic insert needs a secondary operation, but leaves the mold simple and the cycle fast. A cold press-in insert needs only a press, so its installation cost is the lowest of the four. At low volumes the secondary operation is cheap in total and the simple mold wins; at high volumes the molded-in solution — expensive to tool, cheap to run — can overtake it. Compare suppliers on the same scope for the same annual volume: insert, tooling change, cycle or secondary-operation time, and handling.
Frequently asked questions
Can I use a metal insert in a thermoset part?
Yes, but only by molding it in or cold-pressing it in. Heat staking and ultrasonic insertion re-melt plastic, and a thermoset does not soften when reheated. For a thermoset, the choice is between the strongest bond — molded-in — and the cheapest installation — cold press-in.
My boss cracked when the screw was torqued. Is the insert at fault?
Not necessarily. A cracked boss can come from a boss wall that is too thin, a hole that is too small for the insert, a resin that is too brittle at the service temperature, a weld line through the boss, or a torque value higher than the joint was designed for. Check boss dimensions and hole size against the insert manufacturer’s recommendation first, then torque, then resin — before changing the insert.
Send the drawing and your fastening requirements
If your part needs a screw joint that survives repeated assembly, send the CAD and the 2D drawing with the boss and insert callouts marked, the resin grade, how often the joint will be opened, the load it must carry, the thread size and insert material if fixed, quantities, delivery region and timing. Contact Cavity Mold with the part files and the fastening requirements, and the engineering review can confirm the insert method, the boss design and the T1 evidence before tooling is quoted.