

2-shot injection molding creates a multi-material part by molding a substrate and then adding a second resin in the same production cycle. The result can combine a rigid structure with a soft grip, seal, color, or protective layer while reducing separate assembly steps.
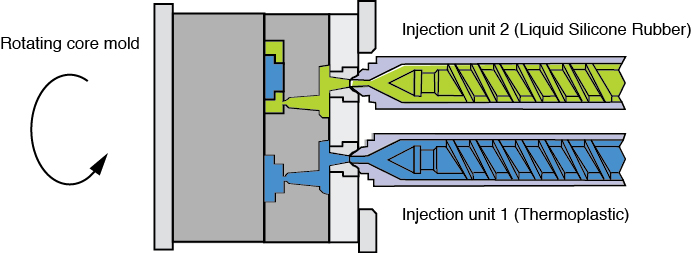
The process is attractive when the two materials, tool, and production volume are sufficiently stable to justify a specialized mold. It is not automatically the best choice for every two-material part: pick-and-place overmolding or a separate assembly may be more economical for prototypes, changing designs, or lower volumes.
How 2-shot injection molding works
A two-shot tool produces the first material as a substrate and then exposes the areas that must receive the second material. The second shot may be injected after a rotary mold transfer, a core-back movement, or a robot transfers the substrate to a second position. The exact mechanism depends on geometry, machine capability, material compatibility, and the required production rate.
- Define the functional role of each material, including stiffness, grip, sealing, appearance, temperature, and chemical exposure.
- Design the substrate so it can fill, cool, locate, and remain stable during the second shot.
- Choose the two-shot method: rotary, transfer, core-back, or a validated alternative.
- Balance gates, vents, cooling, and ejection for both stages rather than optimizing only the first shot.
- Validate adhesion, dimensional stability, appearance, and cycle repeatability before production release.
Two-shot molding versus pick-and-place overmolding
| Decision factor | 2-shot molding | Pick-and-place overmolding |
|---|---|---|
| Tooling | One specialized, more complex tool | Usually two simpler tools |
| Automation | Highly automatable within the press | Manual or robotic loading between operations |
| Bonding opportunity | Can overmold a warm substrate quickly | Cool substrate may need mechanical retention or surface preparation |
| Best fit | Stable designs and higher production volume | Prototypes, bridge tooling, and lower or uncertain volumes |
These are decision tendencies, not universal volume cutoffs. A part with a difficult bond, many orientation features, or a tight takt time may favor two-shot molding earlier than a simple grip part. A design with unproven materials may justify pick-and-place even when the expected volume is substantial.
Material compatibility and bonding
Bonding can be chemical, mechanical, or a combination. The substrate and overmold must be evaluated as a pair. Consider melt temperature, wetting, shrinkage, crystallinity, surface energy, fillers, additives, and whether the substrate is still warm when the second material arrives. A material supplier’s bonding data is a useful starting point, but production validation should use the selected grades, colorants, processing window, and actual tool surface.
Where chemical adhesion is uncertain, use mechanical retention such as holes, slots, dovetails, undercuts, or wraparound features. These features must be designed so they do not create excessive stress, trapped air, thin sections, or difficult ejection.

Part and mold design checklist
- Keep the substrate stable during the second shot; prevent thin walls from flexing when the mold transfers or rotates.
- Use gradual wall transitions and core out thick areas to limit sink, voids, and differential shrinkage.
- Define the visible parting line and gate witness locations before committing to cosmetic requirements.
- Provide draft for both materials and account for texture, shrinkage, and the direction of each ejection movement.
- Separate cooling circuits where the first and second materials impose different heat loads.
- Review vents at the end of fill and around retention features to avoid gas traps and incomplete bonding.
For complex parts, a DFM review should include a fill and cooling assessment for both shots. The [engineering team](/engineering/) can use this review to identify whether a simple mold change, a different overmold method, or a design split would reduce risk.
How to validate a two-shot process
Do not approve the process on appearance alone. Define a validation plan that measures the interface and the finished part:
- Visual inspection for flash, short shots, knit lines, sink, color migration, and interface defects.
- Peel, pull, torque, compression, leak, or flex testing appropriate to the product.
- Dimensional checks before and after conditioning, temperature exposure, or chemical exposure when relevant.
- Short-shot and process-window trials to confirm the two stages remain stable as the mold reaches production temperature.
- Traceability for resin lot, drying, mold temperature, cycle time, and first-off approval.
RFQ information for 2-shot injection molding
Send the 3D model, 2D drawing, material grades, color targets, annual volume, cosmetic zones, bond requirements, and test conditions. State whether the second material must chemically bond or may use mechanical retention. Also identify whether the design is frozen and whether the project requires two-shot equipment, a rotary system, or a lower-cost pick-and-place route.
For a practical tool and process review, [contact Cavity Mold](/contact/) with the part files and expected production volume. The recommended process should be based on the finished part requirements, not on the label “two-shot” alone.
Technical reference
For a comparison of two-shot, pick-and-place, bonding, material compatibility, and production-fit considerations, see the Protolabs overmolding and insert molding guide.
Decisions that make a two-shot tool feasible
Two-shot molding is a sequence and interface problem as much as a material problem. Define which material is molded first, how the first shot is transferred or retained, where the second shot seals, and which surfaces must remain exposed. Rotary, index, core-back, and transfer concepts create different clearance, timing, maintenance, and handling requirements.
| Decision | Evidence to review |
|---|---|
| Material pair | Exact grades, additives, shrinkage difference, chemical exposure, and processing window. |
| Transfer | Datums, nests, lifters, slides, shutoffs, and protection of the first shot. |
| Interface | Mechanical locks, bond area, flash limit, pull or peel requirement, and cosmetic zones. |
| Sequence | Fill order, cooling state, mold temperature, and second-shot distortion risk. |
Do not assume a general compatibility chart proves a bond for the exact grades, colorants, or service environment. Confirm supplier data and a representative trial. Include the sequence, interface drawing, volume, cosmetic standard, and functional test in the tooling RFQ; use the engineering review before steel is frozen.