
Slow PMMA cycles eat your profit. Every extra second on the press adds up fast across thousands of parts. Worse, when you rush the wrong way, you get haze, sink marks, and scrap1. There is a smarter path.
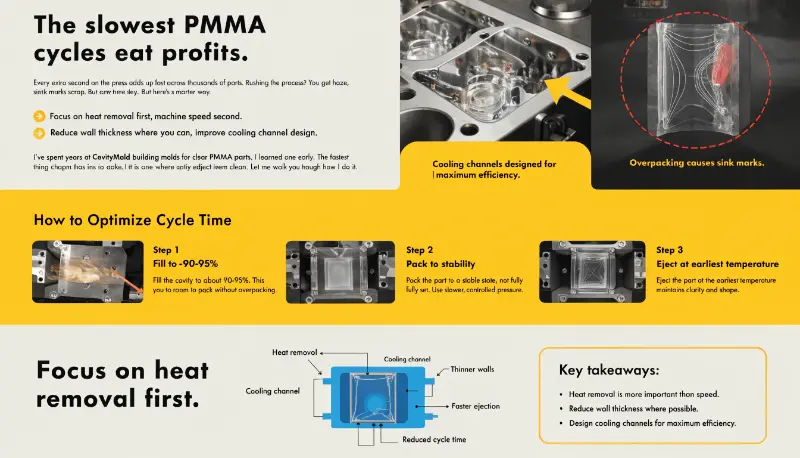
To optimize PMMA injection molding cycle times, focus on heat removal first and machine speed second. Reduce wall thickness where you can, improve cooling channel design, fill the cavity to about 90–95%, then pack2, and eject at the earliest temperature that still keeps clarity and shape stable.
I have spent years at CavityMold building molds for clear PMMA parts. I learned one thing early. The fastest cycle is not the one where you push the press hardest. It is the one where the part cools smart and ejects clean. Let me walk you through how I do it.
Why Does Cooling Time Matter Most for PMMA?
Your press spends most of each cycle waiting for the part to cool. If you ignore that, you are chasing the wrong problem. Speeding up injection saves you a fraction of a second. Fixing cooling can save many seconds.
Cooling is the biggest single part of a PMMA cycle, often more than half. The best way to lower cycle time is to remove heat faster with good cooling channel design and steady mold temperature control, while ejecting the part only when it is stable enough to hold its shape and clarity.
Treat It as a Heat Problem
I always tell my clients like Alex to think of cycle time as a heat-removal job. PMMA is thick, clear, and slow to cool. Heat must leave the part evenly. If it does not, you get warpage or internal stress. That stress shows up as haze or cracks later.
Where the Time Goes
Here is how a typical PMMA cycle breaks down. Use this to find your biggest target.
| Cycle Stage | Rough Share of Time | Where to Save |
|---|---|---|
| Injection (fill) | 10–15% | Higher speed, no burn |
| Packing/holding | 10–20% | Balance gate freeze |
| Cooling | 40–60% | Best gains here |
| Mold open/close | 10–15% | Cut stroke length |
| Ejection | 5–10% | Better mold release |
My Rule
I measure each stage first. I never guess. When cooling is the biggest number, I know where to work. If the screw is still turning when cooling ends, the machine is my bottleneck, not the mold. This simple check saves hours of wrong fixes.
How Can Mold Design Cut PMMA Cycle Times?
Bad mold design locks you into a slow cycle forever. No machine setting can fix a mold that traps heat. The mold is where the biggest, longest-lasting gains live.
Cut PMMA cycle times through mold design by reducing wall thickness where the part allows, placing water lines close and evenly, using high thermal conductivity steel, and adding conformal cooling for complex shapes. Thinner walls solidify faster, and better heat extraction pulls seconds off every single cycle.
Thinner Walls Cool Faster
Wall thickness rules cooling time. A thick section holds heat like a brick. When the part design allows, I trim wall thickness. This one change can cut cooling time a lot. But I check the part still fills and stays strong. For PMMA, thinner walls also lower the risk of sink marks.
Smart Cooling Channels
Water lines must sit close to the cavity and move heat evenly. I aim for turbulent coolant flow, not slow lazy flow. Turbulent flow pulls heat much faster. For tricky shapes, I use conformal cooling. These channels follow the part surface. Standard drilled lines cannot reach every hot spot, but conformal ones can.
Better Steel and Coatings
I pick steel with high thermal conductivity for hot areas. It moves heat out fast. I also add surface coatings inside the cavity. Good coatings help the part release cleanly. That means less ejection time and fewer drag marks. On clear PMMA, clean release matters a lot for surface quality.
| Design Choice | Effect on Cycle |
|---|---|
| Thinner walls | Faster solidification |
| Conformal cooling | Even heat removal |
| High-conductivity steel | Quicker heat transfer |
| Cavity coatings | Faster, cleaner ejection |
| Short open stroke | Less wasted motion |
What Machine Settings Speed Up PMMA Molding?
Wrong settings waste seconds every shot. Right settings shave time without hurting the part. But PMMA is fussy. Push too hard and you get burn marks or streaks that ruin clarity.
Speed up PMMA molding by setting injection speed as high as possible without shear burn, filling the cavity to about 90–95% before packing, tuning screw speed and back pressure for smooth plastication, and trimming mold-open and ejection travel so the press wastes no motion each cycle.
Fill Fast, Then Pack
I fill the cavity to about 90–95% during the fast fill phase. Then I switch to packing to finish the part. This keeps the fill quick and the surface smooth. I do not stretch cooling to make up for a slow fill. That just wastes time.
Injection Speed With Care
PMMA can show optical defects if you push shear too hard. So I raise injection speed step by step. I watch for burn marks and silver streaks. I stop at the highest speed that still gives clear, clean parts. This gets me a faster fill without scrap.
Screw Speed and Back Pressure
Screw speed and back pressure control how the melt is prepared. I fine-tune both. Too much back pressure heats the melt too long. Too little leaves the melt uneven. I want the screw to finish recovery before cooling ends. If it does not, my machine drags the whole cycle.
Cut Wasted Motion
I trim the mold-open stroke to only what I need. I shorten ejection travel too. Each of these saves a fraction of a second. Across a full production run, those fractions turn into real hours and real money.
How Do Hot Runners and Material Prep Help?
Cold runners waste material and time. Wet PMMA gives you surface defects and forces slow, careful cycles. Both problems are easy to fix, and both pay off fast.
Hot runners remove runner cooling time and cut material waste, so cycles run shorter. Pre-drying PMMA lowers moisture, which prevents silver streaks and bubbles. Dry pellets and hot runners together let you mold faster and cleaner, since you skip runner solidification and avoid moisture-related defects.
Why Hot Runners Win
A cold runner must cool and eject with the part. That adds time and scrap. A hot runner keeps the melt hot in the channel. There is no runner to cool. So the cycle gets shorter and I waste less material. For clear PMMA, less scrap also means lower cost per good part.
Dry the Pellets
PMMA soaks up moisture from the air. Wet pellets make bubbles, streaks, and haze. To fix this, I pre-dry the material before molding. Dry pellets flow clean and fill fast. This lets me run quicker cycles without fighting surface defects shot after shot.
Simulation Before Steel
I use advanced simulation software before cutting the mold. It shows me fill, pack, and cooling. I test wall thickness and cooling layouts on the screen first. This finds the fastest safe cycle early. It saves me from costly mold changes later.
| Method | Main Benefit |
|---|---|
| Hot runner | No runner cooling, less waste |
| Pre-drying | Fewer surface defects |
| Simulation | Optimized settings before build |
Can Monitoring and Maintenance Keep Cycles Fast?
You dial in a fast cycle, then it slowly drifts. Small problems creep in. A clogged cooling line or worn tool eats your gains. Without watching, you lose speed and never notice why.
Yes. Real-time process monitoring catches bottlenecks and lets you adjust parameters fast, keeping cycle times low. Regular mold maintenance and cleaning prevent clogged cooling lines, worn surfaces, and unexpected stops. Together they keep your PMMA cycle stable, so the fast times you set stay fast over long production runs.
Watch in Real Time
I use sensors to track pressure, temperature, and timing on each shot. When one stage slows down, I see it right away. Then I fix one variable at a time. I change wall behavior, coolant flow, mold temp, or pack time alone. After each change, I check both cycle time and part quality. I never trust cycle time alone.
Keep the Mold Clean
Cooling lines build up scale over time. Scale blocks heat flow. Then cooling slows and the whole cycle grows. So I clean cooling channels on a schedule. I also check cavity surfaces and ejector pins. A clean, well-kept mold runs the same speed on day one and day one thousand.
Verify Quality Every Time
For PMMA, I always confirm clarity and dimensions after any change. A faster cycle with hazy parts is a failure. I want the earliest ejection that still holds shape and shine. That is the real goal.
Conclusion
Faster PMMA cycles start with heat, not horsepower. I focus on mold cooling, smart part walls, and clean filling. Then I tune the machine, add hot runners, dry the material, and watch the process. Do this and you get quick, stable cycles with parts that stay clear.
"Sink Marks in Injection Molding | Causes & Solutions", https://www.moldingdynamics.net/blog/sink-marks-injection-molding/. Insufficient cooling time and improper packing pressure in PMMA molding can produce optical haze from residual stress and sink marks from differential shrinkage, particularly in thicker sections where thermal gradients are pronounced. Evidence role: mechanism; source type: research. Supports: the relationship between inadequate cooling or processing parameters and common PMMA molding defects. Scope note: This describes the physical mechanisms but does not quantify the economic impact of scrap rates ↩
"Exploring the Evolution of Switchover Methods in Injection Molding … – PMC", https://pmc.ncbi.nlm.nih.gov/articles/PMC12030100/. Industry practice for thermoplastic injection molding typically recommends switching from fill to pack phase when the cavity reaches 90–98% full, though optimal values vary by material rheology and part geometry. Evidence role: general_support; source type: research. Supports: the recommended cavity fill percentage before transitioning to packing phase in injection molding. Scope note: General injection molding guidance may not be specific to PMMA’s unique flow and optical properties ↩