
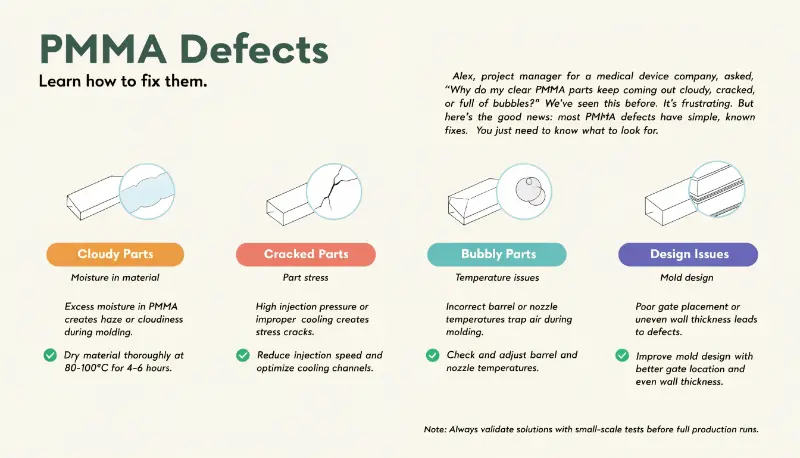
Do your clear PMMA parts come out cloudy, cracked, or full of bubbles?1 That hurts. Rejected parts cost money, waste time, and make clients unhappy. The good news is most PMMA defects have simple, known fixes.
PMMA injection molding problems usually come from moisture, poor temperature control, part stress, or mold design2. The fastest fixes are better drying, tighter heat control, and reducing stress in both the part and the tool. Fix these first, and most defects disappear.
I have spent years watching PMMA go wrong on the shop floor. Each defect tells a story. Once you learn to read that story, you fix problems faster. Let me walk you through the most common questions I hear from project managers like Alex.
What is a common defect in injection molding?
Ever pulled a part and found streaks, sink marks, or missing corners? Those flaws slow your whole project. And with clear PMMA, every flaw shows.
The most common injection molding defects are short shots, silver streaks, bubbles, sink marks, weld lines, warpage, and cracking. In PMMA, these problems show up more because the material is clear. Moisture and heat cause most of them.
The defects I see most often
Let me break down the big ones. PMMA is transparent, so any small flaw becomes very visible. That makes defects harder to hide.
| Defect | What it looks like | Main cause |
|---|---|---|
| Short shot | Cavity not fully filled | Low pressure or cold melt |
| Silver streaks | Silvery lines on surface | Moisture or gas |
| Bubbles / voids | Air pockets inside | Wet resin, thick walls |
| Sink marks | Dents on thick areas | Weak packing pressure |
| Weld lines | Faint lines where flow meets | Poor flow or gate spot |
| Warpage | Bent or twisted part | Uneven cooling |
| Cracking | Small cracks or crazing | Too much stress |
I always tell my team to look at the defect first. The shape and spot of the flaw point straight to the cause. A sink mark on a thick rib is a packing problem. Silver streaks all over the part scream moisture. Once you match the defect to its cause, you stop guessing and start fixing. This saves hours of trial runs.
Can you injection mold PMMA?
Some people think clear plastic is too tricky to mold well. That fear stops good projects. But PMMA molds just fine when you respect its rules.
Yes, you can injection mold PMMA. It is used for lenses, light covers, and displays. But PMMA has a narrow processing window. You must control heat, drying, and stress carefully to get clear, strong parts.
Why PMMA needs extra care
PMMA is less forgiving than many other plastics. It does not give you much room for error. Push the heat too high and it turns yellow. Cool it wrong and it cracks. This narrow window scares some molders away.
Here are the targets I stick to for good PMMA parts:
| Setting | Target range |
|---|---|
| Drying | 80–90°C for 3–4 hours |
| Barrel temperature | 220–260°C |
| Mold temperature | 60–90°C |
Stay inside these numbers and you avoid haze, bubbles, color change, and stress cracks. I also keep injection speed lower for PMMA. Fast speed causes flow lines and shear damage. Slower filling gives a smoother, clearer surface. Design matters too. I use polished mold surfaces, strong venting, and uniform wall thickness. Sharp corners cause cracks, so I round every transition. A good gate design fills complex parts evenly and prevents ugly weld lines in visible spots. When you treat PMMA with respect, it rewards you with glass-clear parts.
Does PMMA need to be dried?
Have you ever molded a batch and found silvery streaks everywhere? That defect wastes whole runs. And it almost always comes from one thing: water in the resin.
Yes, PMMA must be dried before molding. It absorbs moisture from the air. Wet resin causes bubbles, silver streaks, and voids. Dry PMMA at 80–90°C for 3–4 hours and keep it protected until you use it.
Why moisture is your biggest enemy
PMMA is hygroscopic. That is a fancy word meaning it soaks up water from the air. Even if the pellets look dry, they may hold hidden moisture. When that water hits the hot barrel, it turns to steam. Steam makes bubbles, streaks, and weak spots.
I learned this the hard way. One humid morning we skipped proper drying to save time. The whole batch came out with silver streaks. We scrapped it all. Now drying is never optional in my shop.
Here is my simple drying rule:
| Step | Action |
|---|---|
| Dry | 80–90°C for 3–4 hours |
| Store | Keep in a sealed, dry hopper |
| Use fast | Mold before it reabsorbs water |
Dry resin protects clarity. It stops the silver streaks and voids that ruin clear parts. Even after drying, PMMA will pull moisture back from the air. So I keep it covered and use it quickly. This one habit prevents more defects than any machine setting change.
How to troubleshoot injection molding?
When defects pop up, panic makes it worse. Random changes lead to more scrap. You need a clear, calm order to follow.
Troubleshoot injection molding step by step. First fix drying and material. Then check and stabilize temperatures. Next tune fill, pack, and hold settings. After that, check venting and gates. Only then change the part design or resin grade.
My step-by-step troubleshooting order
I always follow the same order. This stops me from chasing the wrong cause. The key rule: treat defects as a process problem first, a mold problem second, and a material problem last.
- Dry the resin properly. Protect it from soaking up moisture again.
- Check all temperatures. Make sure melt, nozzle, and mold heat are stable and not too high.
- Tune process settings. Adjust fill, pack, and hold before touching the tool.
- Check the mold. Look at venting, gate size, and flow balance if defects stay.
- Relieve stress. If cracks remain, try annealing to release internal stress.
Here is how I match fixes to common defects:
| Defect | My first fix |
|---|---|
| Short shot | Raise pressure, speed, or temperature |
| Silver streaks | Dry resin, lower barrel heat |
| Bubbles | Improve drying and packing |
| Sink marks | Add packing pressure early |
| Weld lines | Raise mold temp, move gate |
| Warpage | Balance cooling, even walls |
| Cracking | Ease pressure, anneal part |
I also adjust holding pressure to cut warpage and shrinkage. I control cooling time to keep parts stable and stress-free. And I keep the screw and barrel clean. Regular maintenance stops contamination and keeps quality steady. This ordered method turns a stressful defect hunt into a calm checklist.
Conclusion
PMMA molding gets easier once you know the rules. Dry your resin. Control your heat. Reduce stress. Fix the process first, then the mold, then the material. Follow this order and your clear parts will come out strong and flawless every time.
"Crazing Initiation and Growth in Polymethyl Methacrylate under …", https://pmc.ncbi.nlm.nih.gov/articles/PMC10052915/. Technical literature on PMMA processing documents that the most frequently observed defects in injection-molded acrylic parts are reduced transparency (cloudiness), stress-induced fracture, and gas entrapment (bubbles or voids), each corresponding to specific processing failures. Evidence role: general_support; source type: research. Supports: The characteristic defect types observed in injection-molded PMMA components include loss of optical clarity, stress cracking, and void formation. ↩
"An evaluation of a hepatotoxicity risk induced by the … – PMC", https://pmc.ncbi.nlm.nih.gov/articles/PMC11058773/. Research on thermoplastic processing identifies moisture absorption, inadequate temperature control, internal stress concentration, and mold geometry as the dominant factors contributing to defects in PMMA injection molding, with hygroscopic moisture being particularly critical due to PMMA’s affinity for water absorption. Evidence role: mechanism; source type: research. Supports: The primary defect mechanisms in PMMA injection molding relate to moisture sensitivity, thermal processing parameters, residual stress, and tooling geometry. Scope note: Studies typically focus on controlled laboratory conditions rather than production floor variables ↩