

Back pressure in injection molding is the resistance applied to the screw while it rotates and recovers the next shot. It influences how the pellets melt, how consistently the shot is compacted, how color and additives disperse, and how much shear heat is added. It is a melt-preparation control—not a universal correction for short shots, splay, or dimensional variation.
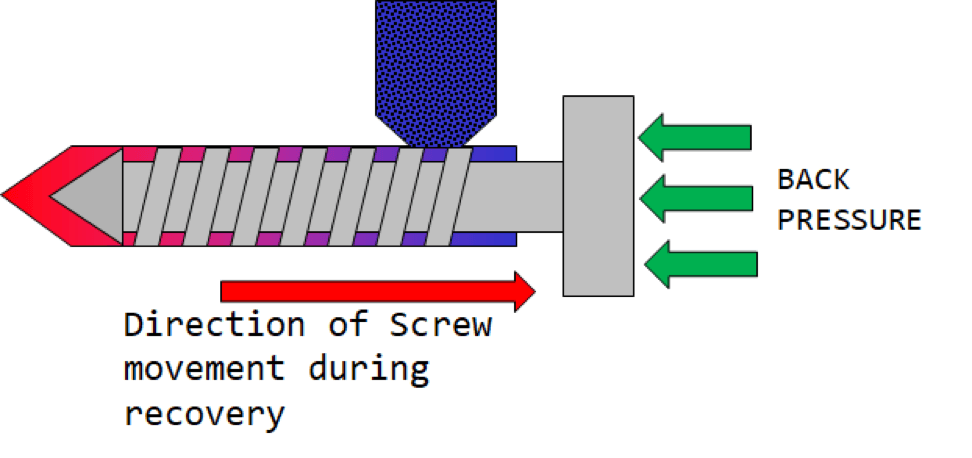
What does back pressure control?
During screw recovery, the screw rotates and moves backward as material accumulates in front of it. Back pressure resists that backward movement. The resistance can improve melt density and mixing, but it also changes recovery time, melt temperature, residence time, and the amount of material delivered for a given screw position.
Back pressure is different from injection pressure and holding pressure. Injection pressure drives the screw forward while filling the cavity. Holding pressure packs the part after the velocity-to-pressure changeover. Back pressure acts during plasticizing, before the next shot is injected.
RJG explains the relationship between back pressure, melt preparation, and shot-to-shot repeatability in its back-pressure technical guide. Its reference values are starting points for a specific machine and resin, not universal settings.

How too little or too much back pressure appears
| Condition | Possible result | What to verify |
|---|---|---|
| Too little | Less uniform melting or color dispersion, variable shot density, unmelted material, and unstable cushion | Pellet feed, screw design, recovery profile, melt temperature, and part-weight trend |
| Too much | Extra shear and heat, longer recovery, degradation risk, excessive residence, or a change in shrinkage | Measured melt temperature, recovery time, screw speed, purge, and material limits |
| Changing value without revalidation | Different shot density changes filling, packing, weight, dimensions, and cycle | Recheck transfer, cushion, pack, cooling, and quality data after any change |
A change that makes one defect disappear may simply change the amount or temperature of material entering the mold. That can hide the real issue in the gate, vent, material handling, screw, or process profile. Use the smallest deliberate adjustment and record the before-and-after data.
How to set and validate back pressure
- Start with the selected resin supplier’s processing guidance and the machine manufacturer’s pressure definition.
- Confirm whether the displayed value is hydraulic pressure, specific pressure, or another machine-specific value.
- Stabilize material drying, barrel temperature, screw speed, recovery position, cushion, and cycle before judging back pressure.
- Make a controlled change and monitor recovery time, melt temperature, cushion, shot weight, appearance, and critical dimensions.
- Choose the lowest setting that gives consistent melt preparation and a repeatable process window.
Do not use back pressure to compensate for a gate that is too small, poor venting, a worn check ring, an incorrect transfer point, or a cooling problem. Those causes require their own correction.

Back pressure and common molding problems
- Color variation: verify masterbatch dispersion, screw design, residence time, purge, and back pressure together.
- Splay or bubbles: check moisture, contamination, trapped air, excessive shear, and melt temperature before raising back pressure.
- Part-weight variation: review non-return valve sealing, cushion, shot size, transfer, recovery, and cavity balance.
- Warpage or dimensions: remember that a different melt density or temperature can change packing and shrinkage, even if the mold is unchanged.
For a full process review, see Cavity Mold’s injection molding process guide, engineering support, and injection molding service. Contact Cavity Mold with the resin grade, machine type, current setup sheet, and defect data.
Record back-pressure changes as a process experiment
When back pressure changes, track screw-recovery time, melt or nozzle temperature where measured, cushion, shot weight, color dispersion, visible defects, and critical dimensions. This shows whether melt preparation improved or the problem moved into residence time, shear heat, or cycle stability.
| Observation | Possible interpretation |
|---|---|
| Shot weight becomes more consistent | Melt density or metering may have improved; verify dimensions. |
| Recovery takes longer | Resistance may add cycle time or shear; confirm the trade-off. |
| Color or additive dispersion changes | Review mixing, residence time, feed, and contamination. |
| Splay or degradation appears | Check heat history, moisture, shear, and material handling. |
Use the selected resin supplier’s recommendations as a starting boundary, then validate on the actual machine, screw, mold, and part. Do not use back pressure to hide blocked vents, poor drying, unstable check-ring behavior, or an incorrect fill/pack profile. Share trial data through the engineering page when the root cause is uncertain.