
Cracked acrylic parts frustrate every project manager. You design a clear, clean cover, then it crazes or snaps under a screw. That small crack costs you time, money, and trust. I have seen this happen, and it hurts.
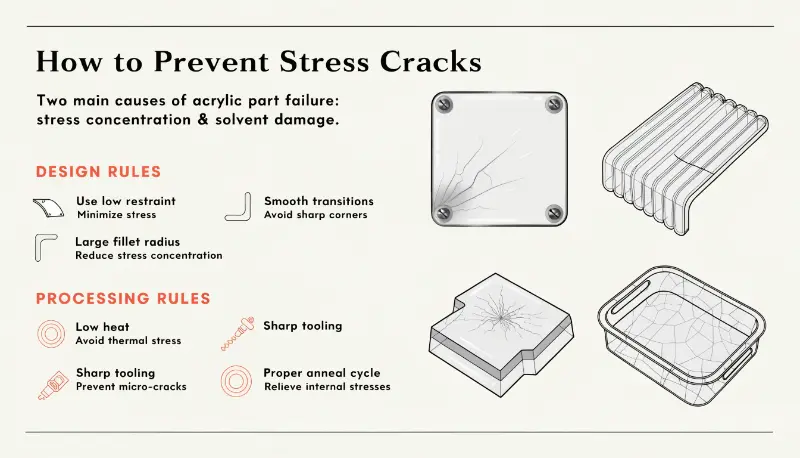
You manage stress in acrylic parts by designing for low restraint, using large fillet radii, and keeping smooth transitions. Then you process the material with low heat, sharp tools, and a proper anneal cycle1. This lowers stress concentration and solvent damage, the two biggest failure drivers2.
I have spent years helping clients avoid these problems. In this post, I will share the design and processing rules I trust most. Let me walk you through each step, so your acrylic parts stay strong and clear.
Why Does Acrylic Design Cause So Much Stress?
I once watched a beautiful acrylic cover fail in days. The reason was simple. Sharp corners and rigid screws packed all the stress into tiny spots. Acrylic hates that. It cracks fast.
Acrylic design causes stress when corners are sharp, wall thickness changes suddenly, or mounting is too rigid. These features force stress into small areas. Large fillet radii, uniform walls, and floating mounts spread the load, so the part can expand and contract without cracking.
The Core Design Rules I Follow
Acrylic is sensitive to local stress. So I always round every corner, hole, and groove. Bigger radii lower the peak stress a lot. I never leave sharp inside corners, because they start cracks. I also keep wall thickness even. Sudden changes create weak spots.
Mounting matters too. I avoid tight screws directly on acrylic. Instead, I use oversize holes, grommets, or floating mounts. This lets the part move with temperature.
A Quick Reference Table
| Design Feature | Bad Choice | Better Choice |
|---|---|---|
| Corners | Sharp edges | Rounded fillets |
| Wall thickness | Sudden changes | Uniform, gradual |
| Mounting | Tight screws | Grommets, oversize holes |
| Transitions | Abrupt load paths | Smooth, gradual |
| Inserts | Sharp metal edges | Rounded, well-spaced |
I also keep unsupported spans short. Acrylic’s long-term strength is lower than its short-term strength. Time and heat weaken it. So I plan for that from the start. These small choices save big headaches later.
How Do Machining and Processing Add Stress?
I have seen a perfect design ruined at the shop floor. A dull tool and fast feed rate melted the edge. Days later, tiny cracks appeared. That heat left hidden stress inside the part.
Machining adds stress through heat, dull tools, and solvent exposure. You reduce this with sharp cutters, light cuts, and slow feed rates. Use air or safe coolants, never solvent-based ones. Support the exit side when drilling to prevent chips and notches that start cracks.
The Processing Steps I Trust
Heat is the enemy. So I keep it low. I use sharp cutters and take light cuts. I slow the feed rate. This stops the surface from overheating and crazing.
For drilling, I use sharp, zero-rake drills. I support the exit side too. This prevents chipping and notches. Notches are cracks waiting to happen.
Coolants help, but I choose them with care. Solvent-based coolants trigger stress cracking. Air or water-safe options work better.
Common Mistakes That Cause Failure
I keep a simple mental list of what to avoid:
- Tight screws directly on acrylic.
- Sharp corners left "as machined."
- Flame polishing, then bonding right away.
- Cleaning with acetone, alcohol, or chlorinated solvents.
- Overheating during laser cutting, routing, or drilling.
Solvents deserve extra care. Many cleaners, paints, and cements attack acrylic. They cause crazing over time. So I only use products made for acrylic. This one rule prevents many failures.
Why Is Annealing So Important for Acrylic?
I used to skip annealing to save time. That was a costly mistake. My parts cracked at the bonded edges. The hidden stress from machining had no way out.
Annealing relieves internal stress in acrylic. You heat the part evenly, then cool it slowly. This is vital after machining, sanding, or flame polishing, and before bonding or coating. Proper annealing improves durability and stops cracks from forming at stressed edges.
How I Handle Annealing and Storage
Machining, sanding, and flame polishing leave stressed edges. So I anneal parts before I bond or finish them. This releases the trapped stress. The part becomes far more reliable.
Storage matters too. I store sheets flat and well-supported. I keep them dry and in a stable place. Warpage and moisture add stress before work even starts.
For thermally formed parts, I heat and cool evenly. Uneven heat is a top cause of internal stress and distortion.
Annealing at a Glance
| Step | What I Do | Why It Matters |
|---|---|---|
| After machining | Anneal before bonding | Removes edge stress |
| Heating | Slow and uniform | Avoids new stress |
| Cooling | Gradual, even | Prevents distortion |
| Storage | Flat, dry, supported | Stops pre-fab stress |
I also think about the finished life of the part. UV light and chemicals add stress over time. So I apply protective coatings when needed. And I add expansion joints or flexible mounts in assemblies. This lets the part move with heat instead of fighting it. All these steps work together. They keep my acrylic parts clear, strong, and crack-free for years.
A Real Example That Ties It Together
Let me share a simple case. I designed a bracketed acrylic cover. I made the form curved and ribbed, with rounded corners. I used oversize mounting holes and rubber grommets, not rigid screws.
The result was excellent. The part moved freely with temperature. The stress spread out instead of building up. It did not craze over time. This small set of choices made all the difference.
Conclusion
Managing stress in acrylic is not hard. I design with rounded corners, even walls, and floating mounts. I machine with sharp tools, low heat, and slow feeds. I anneal parts and store them with care. Follow these rules, and your acrylic parts stay strong, clear, and reliable.
"The Effect of Poly (Methyl Methacrylate) Content on Chemical …", https://pmc.ncbi.nlm.nih.gov/articles/PMC12300782/. Thermal annealing of PMMA at temperatures below the glass transition (typically 80-90°C) has been shown to relieve residual stresses from machining and forming operations, reducing susceptibility to environmental stress cracking and improving dimensional stability. Evidence role: mechanism; source type: research. Supports: the effectiveness of thermal annealing in reducing residual stress in acrylic. Scope note: Optimal annealing parameters depend on part thickness, prior processing history, and specific PMMA formulation. ↩
"Crazing Initiation and Growth in Polymethyl Methacrylate …", https://pmc.ncbi.nlm.nih.gov/articles/PMC10052915/. Materials science literature documents stress concentration at geometric discontinuities and environmental stress cracking from solvent exposure as primary failure modes in polymethyl methacrylate components, particularly under combined mechanical and chemical loading conditions. Evidence role: mechanism; source type: research. Supports: the dominant failure mechanisms in acrylic (PMMA) components. Scope note: The relative ranking of these mechanisms as ‘biggest’ may vary depending on application environment and part geometry. ↩