

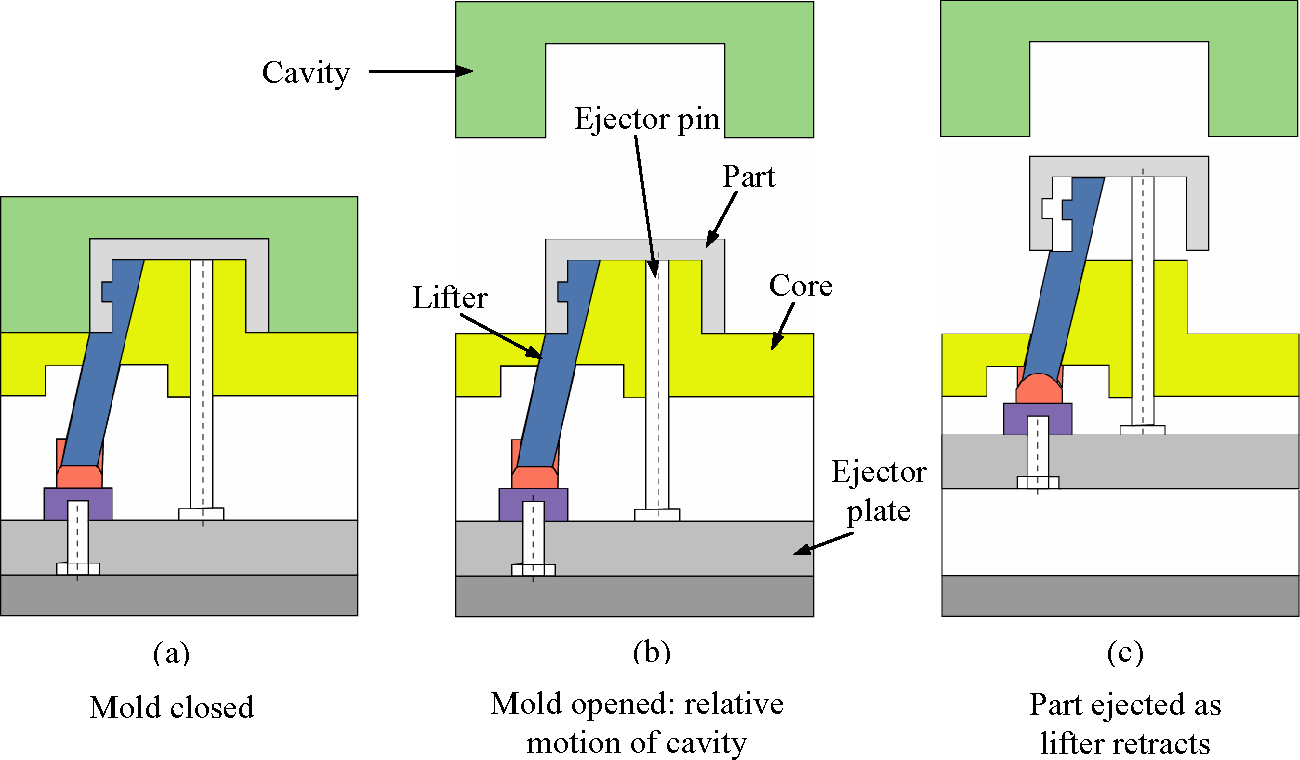
A lifter is an angled ejector component that combines upward ejection with lateral movement to release an internal undercut. It is commonly used for internal hooks, snap features, windows, and pockets that cannot be released with a straight ejector stroke.
Lifter design is a mechanical and molding decision at the same time. The lifter must clear the undercut, support the part during ejection, survive repeated sliding contact, and avoid creating a new drag mark or weak section in the molded part.
Lifter versus slide
| Question | Lifter | Slide |
|---|---|---|
| Where is the feature? | Usually an internal undercut | Usually an external side undercut |
| How does it move? | Angled movement during ejection | Lateral movement before or during mold opening |
| Main risk | Bending, head interference, insufficient clearance, or ejection mark | Locking, travel, wear, timing, and side-action flash |
| Possible alternative | Redesign the hook, split the part, or use a collapsible core | Parting-line change, relief, or side core |
The simplest reliable mechanism is usually the best one. Each lifter or slide adds tool cost, moving interfaces, maintenance, and a potential quality variable.
Core geometry and travel
For a lifter angle measured from the ejector direction, the lateral travel is related to the ejector stroke and the angle. The design must provide enough lateral movement to clear the undercut before the part is fully forced off the core. Confirm the relationship in the actual CAD assembly rather than relying on a rule of thumb.
- Define undercut depth, release direction, and the required clearance.
- Choose lifter angle and stroke so the head clears before the part is stressed.
- Maintain enough body thickness for strength and enough steel around the lifter hole.
- Use radii and a tapered head where they support flow, strength, and release.
- Check adjacent ejector pins, ribs, cooling channels, screws, and the mold base.
Lifter head and part design
The lifter head forms the undercut and therefore needs draft, clearance, and a wear strategy. Sharp corners can concentrate stress and make polishing difficult. Thick plastic around the head can create sink, while a very thin wall may deform under ejection. Add radii, core out heavy sections, and provide a controlled shutoff or relief where the design allows.
When the feature is cosmetic or sealing-critical, define the lifter witness and parting line early. The best lifter mechanism cannot remove every witness mark if the head forms a visible surface.
Wear, cooling, and maintenance
- Use suitable hardened or wear-resistant components for the lifter body and head based on resin and volume.
- Provide guiding and support so the lifter does not rub or tilt in the ejector assembly.
- Check whether the lifter blocks cooling or creates a hot spot around a thick feature.
- Provide lubrication access and a maintenance interval for sliding surfaces.
- Design replaceable lifter heads or inserts when the feature is abrasive or likely to be corrected.
- Inspect straightness, head wear, clearance, return position, and galling during mold service.
Trial and troubleshooting checklist
- Run the mold slowly and verify that all lifters move together without binding.
- Check return position before mold close and confirm no lifter is proud of the core.
- Inspect the undercut for drag, whitening, cracks, deformation, and flash.
- Measure ejection force or observe the load pattern when the mark is inconsistent.
- Adjust draft, clearance, cooling, packing, or ejection only after identifying the mechanism.
Can the lifter be avoided?
Ask whether the undercut can be opened to the parting line, made flexible, split into an assembly, or replaced with a simpler feature. A small geometry change can remove a lifter, reduce the risk of ejection marks, and simplify maintenance. The trade-off may be a visible parting line, an assembly step, or a small change in functional performance.
The [engineering team](/engineering/) can review alternatives before the [mold-making process](/mold-making/) begins. [Contact Cavity Mold](/contact/) with the part model, undercut depth, material, and volume for a lifter feasibility review.
Technical references
The DME mold-components catalog includes UniLifter design information; final dimensions must be calculated for the actual mold.