

There are different ways to avoid air and liquid getting trapped in your part. Any liquid in the feed is likely to cause problems. Trapped air can be from the moisture content of pellets. It can also be from the atmosphere. In processes where solvent polymerization gets used, air can be from residual solvent. Especially when the pellets are getting used right after polymerization (rare). The air gets trapped in the melted dough as the screw shears the melt. In other processes like simple liquid mixing air escapes by popping out of the liquid. With plastic melts, this is more difficult due to the very high viscosity. The trapped air cannot exert enough pressure to pop out. Making sure that the plastic pellets are well dried is one way of avoiding air. A venting and decompression system within the barrel also helps remove trapped air. At the temperature of injection molding, the liquid will evaporate. If there are no measures to remove the trapped air or it somehow gets to the mold. Including a venting system in the mold gives you one more shot at getting rid of any stubborn trapped air. Trapped air can lead to defects and improper filling of the mold. A well-designed mold incorporates venting to address this. Thus far many of our blog posts here at Cavity Mold. Discuss different aspects of injection molding and mold design. Here we look at yet another crucial feature of mold design, venting. It is not enough to add a vent to the mold. The positioning and construction of the vent are also important. Not having enough venting or one that causes other molding problems is as good as having none at all. Or better put, it is as bad as having none at all. In this post, we look at mold venting, why you need it, how to include it, and why you wouldn’t want to do without it.
Importance of Mold Venting

One fundamental principle in thermodynamics is relating to pressure, temperature, and volume. When you have trapped air in the mold one of two things can happen. The air packs in with the melt. This forces a volume of air into a small space. As more plastic fills the mold the pressure increases. As pressure increases in a fixed volume, you have air particles colliding. These collisions lead to energy release. With no space for the air to spread out to turn this energy into kinetic energy, it gets converted to heat. This heat remains in the mold. The only place to transfer heat energy is to the plastic. This excess heat could be enough to raise the temperature of the melt. This can get above the degradation temperature. This is even more so for temperature-sensitive polymers. This can lead to burning and other imperfections like specks and discoloration.
Another thing that can happen is that the incoming plastic forms around the air. This results in a bubble. The size of the bubble depends on how much air gets trapped. Where the pressure exerted by the plastic is less than that exerted by the air the bubble remains. The mold then cools with this bubble in place. This results in improper filling of the mold. This becomes visible as gaps in the product. This can be visible on the surface or hidden away within the product. When the trapped air ends up on the surface, this appears as surface imperfections. Where it gets hidden away. This can cause weakened parts and/or loss of functionality or performance.
Other problems occur as a result of poor venting. Some of these relate to each other. For example the build-up of oil as a result of overheating. The oil forms as a byproduct of plastic degradation. You can also have warped part as a result of the pressure exerted on the product by the trapped air. Or flashing as a result of melt getting forced out by trapped air.
Thus it becomes clear that mold design requires a lot more than knowledge of the tools and machinery. Mold designers must also understand some fundamental principles of physics. Features like venting can get missed when you observe a mold. So without good knowledge and experience, this can get overlooked with grave consequences. Summarized below is a list of problems that can occur as a result of improper mold venting. These come in handy when troubleshooting injection molding problems.
- Formation of surface imperfection like specks, platelets
- Gas burns or dieseling on the plastic part
- Flash
- Surface imperfections
- Short shots or incomplete mold filling resulting in the poor part formation
- Pressure build-up leading to excess pressure exerted on mold
- Weld lines
- Oily build up from degraded plastics (a result of overheating)
- Part weakness
- Warped part
- Mold cavity corrosion (trapped vapor of water or corroding compounds like HCl)
What Does a vent look Like?
Whether you are trying to design one or you have a mold and are trying to see where the vent is. You want to know what you’re looking out for. Like many things in life, vents come in different shapes and sizes …and numbers. A mold can have vents in different locations. Here are some common features of a vent. Vents can either get machined channels at strategic locations in the mold. Or they can be porous inserts in the mold. These inserts get made of sintered metal. They serve as vents. Location of machined vents and insert vents get discussed further down the article. So you are either looking for a tiny hole in specific locations around the mold. Or a porous insert placed in the mold.

Image illustration of a vent in a closed mold
Considerations in Vent design and implementation
When implementing venting into a mold design there are many factors to consider. Other than the technicality, the mold designer needs to be creative. It is important to be able to incorporate a vent within the given design, size, or tooling limitations. This calls for creativity. A mold maker interacts with different clients with many different product designs. So each project presents a different challenge. Over the years mold makers build experience and design for all kinds of products. Indeed there is no set list of rules on venting. But there are a few recommendations that come in handy. These include several vents, positioning, and others as discussed below.
Number of Vents
How many vents you can fit into a mold depends a lot on the size of the mold and the design details. It is thus important that the venting of the mold get evaluated early in the product design. As you discuss mold and product design venting should be part of the discussion. The size of the individual vent gets determined by the venting needs of the process. Each vent has to be effective in getting out the air in the first place. Having more vents means the air is getting let out from different points in the mold. This means more air escaping per given time. Depending on the product size and design, one vent well positioned could be enough. So is there any limit to the number of vents you can have in a mold?. The answer is, not so much. The recommendation is to use as many vents that your mold allows. As long as it does not adversely affect product formation. You also don’t want to use up production time and tools on adding more vents where they are not necessary. A good understanding of how venting works helps avoid this. Any time or effort spent in manufacturing translates to money. If you are the service provider, you don’t want to spend resources on unnecessary features. Likewise, if you are the client, you don’t want to be paying for features that are not needed. This is why it is important to use experience and skilled mold makers.
Positioning of Vents
Where the vent gets located affects how effective the venting is. Also where several vents exist, the spacing of the vents matters. While locating the vents take into consideration other design parameters of the mold. Factors such as the location of the gate and cooling rate are important. The location of the gate for example determines where the trapped air comes in from. Understanding the flow direction helps in determining how to capture trapped air. The cooling rate determines how much time the air has to escape before the plastic hardens. You of course want to design the venting in such a way that the air escapes almost as soon as the mold gets filled. The flow of fluid and the temperature gradient are easier to simulate than trapped air. This is because the location of the trapped air is random. Sometimes you might not even have any air trapped. Much of your mold vent design is thus based on the most probable outcome. You design the mold to give any trapped air the best chance of escaping as fast as possible.
The general rule with the positioning of the vent is to place them along the parting line. This makes sense as the parting lines are the locations that can accommodate vents. Another general rule is to locate the vent in parts of the mold that get filled last. This way the melt at this point is the last to cool. This leaves the best time for trapped air to escape before the product hardens. A 25mm spacing is the typical recommended between vents. You can also integrate a vent into the ejector pin. This gets placed in the gap between the pin and the pinhole. This should be in such a way that any seepage leading to the flag does not occur.
Melt Viscosity
Different plastics have different physical properties. In injection molding, one important property is the melt viscosity. The viscosity at and above the glass transition temperature. This determines if the product needs to get heated to a higher temperature. Generally applying more heat reduces the viscosity. But the limit to the operating temperature is the melting and degradation temperature. So you might have to design a mold that can handle high viscosity. Venting of high viscosity plastics is even more important. Higher viscosity means that trapped air needs a little more help escaping. High viscous melts call for larger vents. If the vent is too small the force required to get the trapped air out is too high. If the vent is too large, melt sips through along with the air. This results in flash which is undesirable. Flash would mean more time in post-processing or product imperfection. If the flash gets trimmed it means wasted resources on recycling. Either Way, you don’t want this.
Sintered Metal Inserts for Venting
Although only where other options are not possible. You can use sintered inserts for venting. These have tens to ten thousand pores within them. The sintered metals can absorb trapped air within their structures. This GETs is based on the principle that air will always move from high pressure to low pressure. The micropores in the sintered metals absorb trapped air. As the mold cools so does the sintered metal and the pores contract trapping the air. Over time the air gets released. But this can become a problem when the insert gets used in other molds. If there is still air trapped, where does that go?. So the use of inserts is not a sure safe alternative to proper mold venting.
Choosing Between Traditional Machined Vents or Sintered Insert Venting
Locating and machining traditional machined vents can often be a hit and miss. Sometimes even with proper analysis challenges exist in vent location. It then comes down to trying the most promising options. This might mean needing one or more mold modification after testing. This adds time and cost. There is also the possibility of the vent getting clogged over time. Although this gets avoided with proper maintenance. One might also find that the best-suited location for the mold is one that is quite tricky to navigate. In such cases, it might become necessary to consider sintered insert venting options.
Sintered vents offer the advantage of the ease of positioning and adjusting. After repeated use, they can get cleaned using chemical or mechanical methods. But bear in mind that some plastics are not compatible with sintered metal vents. Not to worry, there is a long list of plastics that are well suited for sintered metal vents. Examples are polystyrene, abs, nylon 66, polyethylene, and flexible PVC amongst others.
Venting is not limited to the mold
It is important to vent the runner, sprue, and gate. This prevents back pressure and also gives more outlets for trapped air. Further down the machine. Venting is also included in the barrel. So although the focus of the article is on the mold venting. Do have in mind that vents get included in other parts of injection molding. If you only have venting in the mold. This would mean pushing along any trapped air as the melt progresses from feed to mold. As the air accumulates, pressure builds. This for one thing makes injection more difficult.
Examples of mold vent designs
Mold designers take different approaches to incorporate vents into the mold. The final design of a mold is a combination of technicality and creativity. Below are some examples of different types of vent designs from across the web.


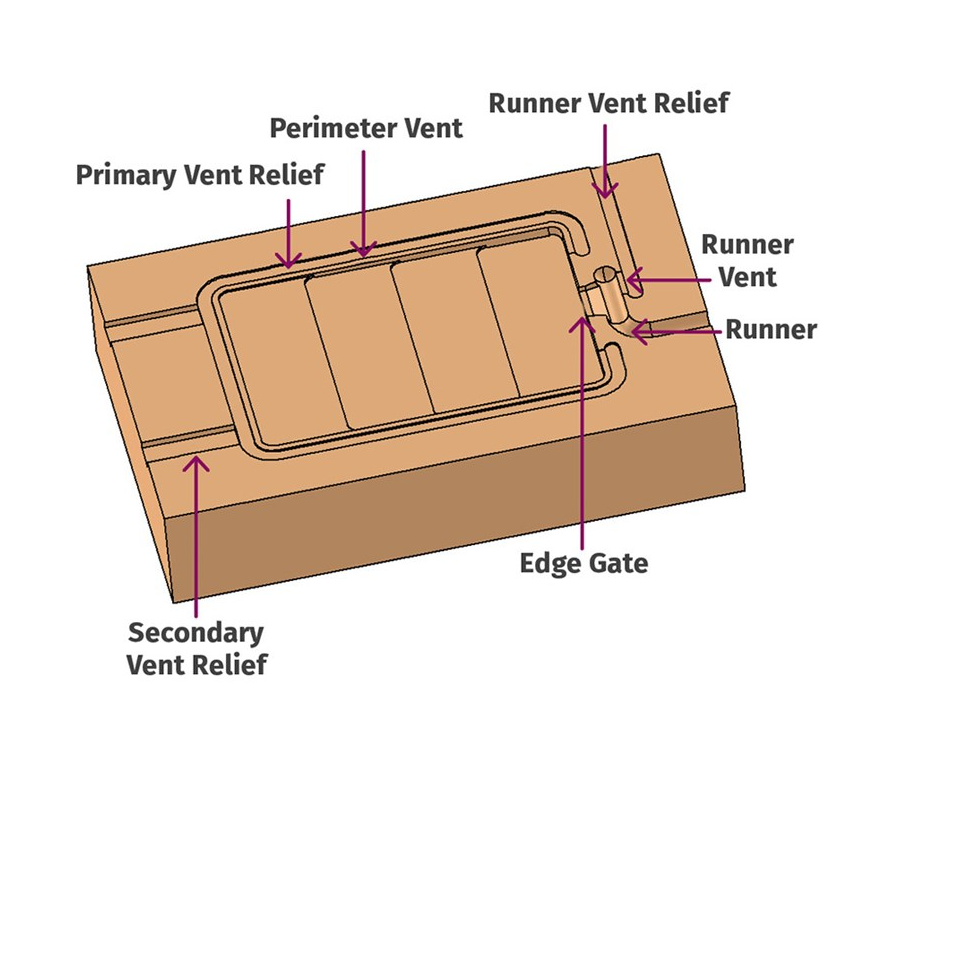

Image examples of different mold vent designs
Conclusion
Venting is an important feature of the mold. From the physical appearance, a vent may seem small and insignificant. But the role vents play is anything but small or insignificant. Proper venting can save you a lot of time and headaches. This is clear from the list of things that can go wrong where venting is not done right. At Cavity Mold, we understand that these tiny details make huge differences. Visit www.cavitymold.com to get more information on the services we offer. You can contact us to discuss how we can work with you to get the best in mold design and injection molding.
Importance of Mold Venting
One fundamental principle in thermodynamics is relating to pressure, temperature, and volume. When you have trapped air in the mold one of two things can happen. The air packs in with the melt. This forces a volume of air into a small space. As more plastic fills the mold the pressure increases. As pressure increases in a fixed volume, you have air particles colliding. These collisions lead to energy release. With no space for the air to spread out to turn this energy into kinetic energy, it gets converted to heat. This heat remains in the mold. The only place to transfer heat energy is to the plastic. This excess heat could be enough to raise the temperature of the melt. This can get above the degradation temperature. This is even more so for temperature-sensitive polymers. This can lead to burning and other imperfections like specks and discoloration.
Another thing that can happen is that the incoming plastic forms around the air. This results in a bubble. The size of the bubble depends on how much air gets trapped. Where the pressure exerted by the plastic is less than that exerted by the air the bubble remains. The mold then cools with this bubble in place. This results in improper filling of the mold. This becomes visible as gaps in the product. This can be visible on the surface or hidden away within the product. When the trapped air ends up on the surface, this appears as surface imperfections. Where it gets hidden away. This can cause weakened parts and/or loss of functionality or performance.
Other problems occur as a result of poor venting. Some of these relate to each other. For example the build-up of oil as a result of overheating. The oil forms as a byproduct of plastic degradation. You can also have warped part as a result of the pressure exerted on the product by the trapped air. Or flashing as a result of melt getting forced out by trapped air.
Thus it becomes clear that mold design requires a lot more than knowledge of the tools and machinery. Mold designers must also understand some fundamental principles of physics. Features like venting can get missed when you observe a mold. So without good knowledge and experience, this can get overlooked with grave consequences. Summarized below is a list of problems that can occur as a result of improper mold venting. These come in handy when troubleshooting injection molding problems.
- Formation of surface imperfection like specks, platelets
- Gas burns or dieseling on the plastic part
- Flash
- Surface imperfections
- Short shots or incomplete mold filling resulting in the poor part formation
- Pressure build-up leading to excess pressure exerted on mold
- Weld lines
- Oily build up from degraded plastics (a result of overheating)
- Part weakness
- Warped part
- Mold cavity corrosion (trapped vapor of water or corroding compounds like HCl)
What Does a vent look Like?
Whether you are trying to design one or you have a mold and are trying to see where the vent is. You want to know what you’re looking out for. Like many things in life, vents come in different shapes and sizes …and numbers. A mold can have vents in different locations. Here are some common features of a vent. Vents can either get machined channels at strategic locations in the mold. Or they can be porous inserts in the mold. These inserts get made of sintered metal. They serve as vents. Location of machined vents and insert vents get discussed further down the article. So you are either looking for a tiny hole in specific locations around the mold. Or a porous insert placed in the mold.
Image illustration of a vent in a closed mold
Considerations in Vent design and implementation
When implementing venting into a mold design there are many factors to consider. Other than the technicality, the mold designer needs to be creative. It is important to be able to incorporate a vent within the given design, size, or tooling limitations. This calls for creativity. A mold maker interacts with different clients with many different product designs. So each project presents a different challenge. Over the years mold makers build experience and design for all kinds of products. Indeed there is no set list of rules on venting. But there are a few recommendations that come in handy. These include several vents, positioning, and others as discussed below.
Number of Vents
How many vents you can fit into a mold depends a lot on the size of the mold and the design details. It is thus important that the venting of the mold get evaluated early in the product design. As you discuss mold and product design venting should be part of the discussion. The size of the individual vent gets determined by the venting needs of the process. Each vent has to be effective in getting out the air in the first place. Having more vents means the air is getting let out from different points in the mold. This means more air escaping per given time. Depending on the product size and design, one vent well positioned could be enough. So is there any limit to the number of vents you can have in a mold?. The answer is, not so much. The recommendation is to use as many vents that your mold allows. As long as it does not adversely affect product formation. You also don’t want to use up production time and tools on adding more vents where they are not necessary. A good understanding of how venting works helps avoid this. Any time or effort spent in manufacturing translates to money. If you are the service provider, you don’t want to spend resources on unnecessary features. Likewise, if you are the client, you don’t want to be paying for features that are not needed. This is why it is important to use experience and skilled mold makers.
Positioning of Vents
Where the vent gets located affects how effective the venting is. Also where several vents exist, the spacing of the vents matters. While locating the vents take into consideration other design parameters of the mold. Factors such as the location of the gate and cooling rate are important. The location of the gate for example determines where the trapped air comes in from. Understanding the flow direction helps in determining how to capture trapped air. The cooling rate determines how much time the air has to escape before the plastic hardens. You of course want to design the venting in such a way that the air escapes almost as soon as the mold gets filled. The flow of fluid and the temperature gradient are easier to simulate than trapped air. This is because the location of the trapped air is random. Sometimes you might not even have any air trapped. Much of your mold vent design is thus based on the most probable outcome. You design the mold to give any trapped air the best chance of escaping as fast as possible.
The general rule with the positioning of the vent is to place them along the parting line. This makes sense as the parting lines are the locations that can accommodate vents. Another general rule is to locate the vent in parts of the mold that get filled last. This way the melt at this point is the last to cool. This leaves the best time for trapped air to escape before the product hardens. A 25mm spacing is the typical recommended between vents. You can also integrate a vent into the ejector pin. This gets placed in the gap between the pin and the pinhole. This should be in such a way that any seepage leading to the flag does not occur.
Melt Viscosity
Different plastics have different physical properties. In injection molding, one important property is the melt viscosity. The viscosity at and above the glass transition temperature. This determines if the product needs to get heated to a higher temperature. Generally applying more heat reduces the viscosity. But the limit to the operating temperature is the melting and degradation temperature. So you might have to design a mold that can handle high viscosity. Venting of high viscosity plastics is even more important. Higher viscosity means that trapped air needs a little more help escaping. High viscous melts call for larger vents. If the vent is too small the force required to get the trapped air out is too high. If the vent is too large, melt sips through along with the air. This results in flash which is undesirable. Flash would mean more time in post-processing or product imperfection. If the flash gets trimmed it means wasted resources on recycling. Either Way, you don’t want this.
Sintered Metal Inserts for Venting
Although only where other options are not possible. You can use sintered inserts for venting. These have tens to ten thousand pores within them. The sintered metals can absorb trapped air within their structures. This GETs is based on the principle that air will always move from high pressure to low pressure. The micropores in the sintered metals absorb trapped air. As the mold cools so does the sintered metal and the pores contract trapping the air. Over time the air gets released. But this can become a problem when the insert gets used in other molds. If there is still air trapped, where does that go?. So the use of inserts is not a sure safe alternative to proper mold venting.
Choosing Between Traditional Machined Vents or Sintered Insert Venting
Locating and machining traditional machined vents can often be a hit and miss. Sometimes even with proper analysis challenges exist in vent location. It then comes down to trying the most promising options. This might mean needing one or more mold modification after testing. This adds time and cost. There is also the possibility of the vent getting clogged over time. Although this gets avoided with proper maintenance. One might also find that the best-suited location for the mold is one that is quite tricky to navigate. In such cases, it might become necessary to consider sintered insert venting options.
Sintered vents offer the advantage of the ease of positioning and adjusting. After repeated use, they can get cleaned using chemical or mechanical methods. But bear in mind that some plastics are not compatible with sintered metal vents. Not to worry, there is a long list of plastics that are well suited for sintered metal vents. Examples are polystyrene, abs, nylon 66, polyethylene, and flexible PVC amongst others.
Venting is not limited to the mold
It is important to vent the runner, sprue, and gate. This prevents back pressure and also gives more outlets for trapped air. Further down the machine. Venting is also included in the barrel. So although the focus of the article is on the mold venting. Do have in mind that vents get included in other parts of injection molding. If you only have venting in the mold. This would mean pushing along any trapped air as the melt progresses from feed to mold. As the air accumulates, pressure builds. This for one thing makes injection more difficult.
Examples of mold vent designs
Mold designers take different approaches to incorporate vents into the mold. The final design of a mold is a combination of technicality and creativity. Below are some examples of different types of vent designs from across the web.
Image examples of different mold vent designs
Conclusion
Venting is an important feature of the mold. From the physical appearance, a vent may seem small and insignificant. But the role vents play is anything but small or insignificant. Proper venting can save you a lot of time and headaches. This is clear from the list of things that can go wrong where venting is not done right. At Cavity Mold, we understand that these tiny details make huge differences. Visit www.cavitymold.com to get more information on the services we offer. You can contact us to discuss how we can work with you to get the best in mold design and injection molding.